kubernetes is a system for managing containerized applications in a clustered environment. It provides basic mechanisms for deployment, maintenance and scaling of applications on public, private or hybrid setups. It also comes with self-healing features where containers can be auto provisioned, restarted or even replicated.
Kubernetes Components:
Kubernetes works in server-client setup, where it has a master providing centralized control for a number of minions. We will be deploying a Kubernetes master with three minions, as illustrated in the diagram further below.
Kubernetes has several components:
- etcd – A highly available key-value store for shared configuration and service discovery.
- flannel – An etcd backed network fabric for containers.
- kube-apiserver – Provides the API for Kubernetes orchestration.
- kube-controller-manager – Enforces Kubernetes services.
- kube-scheduler – Schedules containers on hosts.
- kubelet – Processes a container manifest so the containers are launched according to how they are described.
- kube-proxy – Provides network proxy services.
Deployment on CentOS 7
We will need 4 servers, running on CentOS 7.1 64 bit with minimal install. All components are available directly from the CentOS extras repository which is enabled by default. The following architecture diagram illustrates where the Kubernetes components should reside: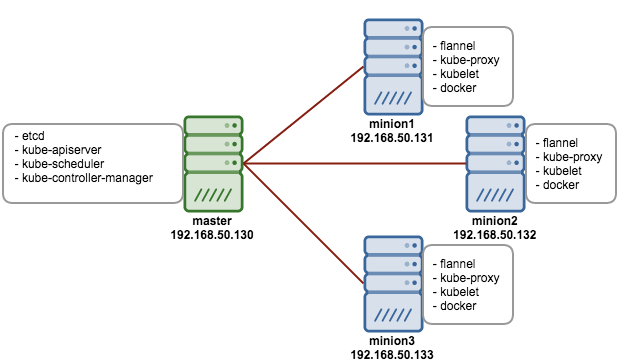 Prerequisites1. Disable iptables on each node to avoid conflicts with Docker iptables rules
$ systemctl stop firewalld$ systemctl disable firewalld2. Install NTP and make sure it is enabled and running:
$ yum -yinstallntp$ systemctl start ntpd$ systemctlenablentpd3. Add an repo on all nodes.
vim /etc/yum.repos.d/virt7-docker-common-release.repo[virt7-docker-common-release]name=virt7-docker-common-releasebaseurl=http://cbs.centos.org/repos/virt7-docker-common-release/x86_64/os/
gpgcheck=0Setting up the Kubernetes Master
The following steps should be performed on the master.
1. Install etcd and Kubernetes through yum:
$ yum -yinstalletcd kubernetes2. Configure etcd to listen to all IP addresses inside /etc/etcd/etcd.conf. Ensure the following lines are uncommented, and assign the following values:
ETCD_NAME=defaultETCD_DATA_DIR="/var/lib/etcd/default.etcd"ETCD_LISTEN_CLIENT_URLS="http://0.0.0.0:2379"ETCD_ADVERTISE_CLIENT_URLS="http://localhost:2379"3. Configure Kubernetes API server inside /etc/kubernetes/apiserver. Ensure the following lines are uncommented, and assign the following values:
KUBE_API_ADDRESS="--address=0.0.0.0"KUBE_API_PORT="--port=8080"KUBELET_PORT="--kubelet_port=10250"KUBE_ETCD_SERVERS="--etcd_servers=http://127.0.0.1:2379"KUBE_SERVICE_ADDRESSES="--service-cluster-ip-range=10.254.0.0/16"KUBE_ADMISSION_CONTROL="--admission_control=NamespaceLifecycle,NamespaceExists,LimitRanger,SecurityContextDeny,ResourceQuota"KUBE_API_ARGS=""4. Start and enable etcd, kube-apiserver, kube-controller-manager and kube-scheduler:
$forSERVICESinetcd kube-apiserver kube-controller-manager kube-scheduler;dosystemctl restart $SERVICESsystemctlenable$SERVICESsystemctl status $SERVICESdone5. Define flannel network configuration in etcd. This configuration will be pulled by flannel service on minions:
$etcdctl mk /kube-centos/network/config "{ \"Network\": \"172.30.0.0/16\", \"SubnetLen\": 24, \"Backend\": { \"Type\": \"vxlan\" } }"6. At this point, we should notice that nodes’ status returns nothing because we haven’t started any of them yet:
$ kubectl get nodesNAME LABELS STATUSSetting up Kubernetes Minions (Nodes)
1. Install flannel and Kubernetes using yum:
$ yum -yinstallflannel kubernetes2. Configure etcd server for flannel service. Update the following line inside /etc/sysconfig/flanneld to connect to the respective master:
FLANNEL_ETCD="http://192.168.50.130:2379"3. Configure Kubernetes default config at /etc/kubernetes/config, ensure you update the KUBE_MASTER value to connect to the Kubernetes master API server:
KUBE_MASTER="--master=http://192.168.50.130:8080"4. Configure kubelet service inside /etc/kubernetes/kubelet as below:
minion1:KUBELET_ADDRESS="--address=0.0.0.0"KUBELET_PORT="--port=10250"# change the hostname to this host’s IP addressKUBELET_HOSTNAME="--hostname_override=192.168.50.131"KUBELET_API_SERVER="--api_servers=http://192.168.50.130:8080"KUBELET_ARGS=""minion2:KUBELET_ADDRESS="--address=0.0.0.0"KUBELET_PORT="--port=10250"# change the hostname to this host’s IP addressKUBELET_HOSTNAME="--hostname_override=192.168.50.132"KUBELET_API_SERVER="--api_servers=http://192.168.50.130:8080"KUBELET_ARGS=""minion3:KUBELET_ADDRESS="--address=0.0.0.0"KUBELET_PORT="--port=10250"# change the hostname to this host’s IP addressKUBELET_HOSTNAME="--hostname_override=192.168.50.133"KUBELET_API_SERVER="--api_servers=http://192.168.50.130:8080"KUBELET_ARGS=""5. Start and enable kube-proxy, kubelet, docker and flanneld services:
$forSERVICESinkube-proxy kubelet docker flanneld;dosystemctl restart $SERVICESsystemctlenable$SERVICESsystemctl status $SERVICESdone6. On each minion, you should notice that you will have two new interfaces added, docker0 and flannel0. You should get different range of IP addresses on flannel0 interface on each minion, similar to below:
minion1:
[root@kube-minion1 ~]# ip a | grep flannel | grep inet

inet 172.30.79.0/32 scope global flannel.1

[root@kube-minion1 ~]#
minion1:
[root@kube-minion2 ~]# ip a | grep flannel | grep inet

inet 172.30.92.0/32 scope global flannel.1

[root@kube-minion2 ~]#
- Now login to Kubernetes master node and verify the minions’ status:
$ kubectl get nodesNAME LABELS STATUS192.168.50.131 kubernetes.io/hostname=192.168.50.131 Ready192.168.50.132 kubernetes.io/hostname=192.168.50.132 Ready192.168.50.133 kubernetes.io/hostname=192.168.50.133 Ready


You must be logged in to post a comment.